Overview
Once you are logged on to CareRight, you can access your User Profile by clicking on your user name in the top right-hand corner of the screen.
The following areas are available under this menu:
- User Profile
- Administration (if you have sufficient access rights)
- Logout

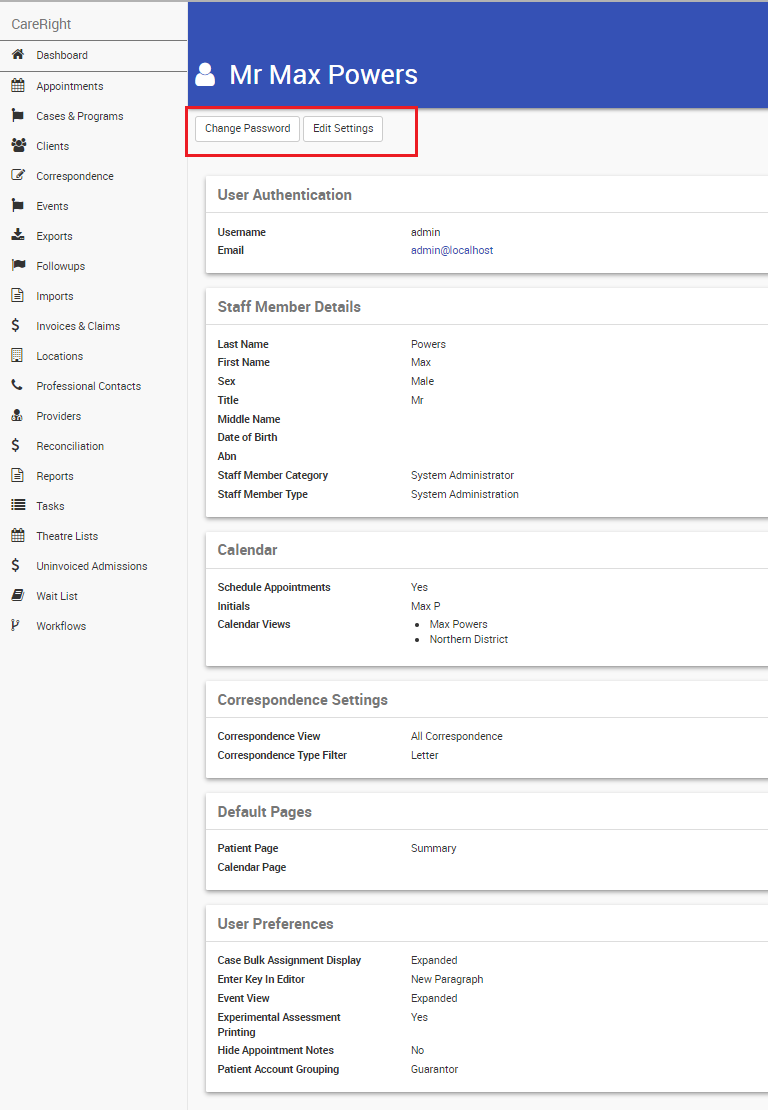
 User Profile Interface
Following actions can be performed from here.
- Change password
- Edit settings
1. Change password
The User Profile page displays a summary of your information and allows you to change your password.
- Click Change Password in the Use profile.
- Enter your current password.
- Enter your new password, then confirm your new password (remember - passwords are case sensitive).
- Click Change Password.
Password Requirements
Your system administrator will be able to advise you as to what length and character mix is required for your password.
Refer to Password Security in the System Admin Guide for more information.
2. Edit Setting
User can change settings to customise the view in CareRight.
- Click Edit Settings in the User profile

Field | Description | Available Options |
Correspondence View | User can select the preferences to view the Correspondence menu. |
|
| Correspondence Type Filter | Setting Default correspondence type filter. |
|
| Default Patient Page | User can set the preference for Default Patient Page upon accessing patient data. Example: the Admin staff can set up default page as Admission. |
|
| Default Calendar View | User can set up Default Calendar View to streamline the clinical scheduling, workflow management, and care coordination. This will save time and get quick access to relevant timeframes to set up the Appointments when in Dashboard > Appointments.  | - This may vary for every Hospital/Practice |
| Default Clinical Note Category | User can set up the Default Clinical Note Category to display the latest clinical notes such as admission note, progress notes, enabling user to take quick, informed decisions. | - This may vary for every Hospital/Practice |
| Locale | User can set up their regional and language preferences by selecting relevant Locale code. Example: ‘en’ for English, ‘ja’ for Japanese. | The Locale Language Codes are available in drop down list. |
| Case Bulk Assignment Display | Case Bulk Assignment view.  |
|
| Enter Key in Editor | Default ENTER tab for Text area in CareRight. |
|
| Event View | The Event screen has two different views, Expanded and Compact. In Expanded view, there is a dedicated panel for each event. In Compact view, the display becomes grid of event. |
|
| Experimental assessment Printing | Recommend you to select the Experimental assessment Printing to yes for better result. | Yes/No |
| Hide Appointment Notes | Appointments notes to set Hide/Display | Yes/No |
| Include Oec Contact Info | Yes/No | |
| Patient Account Grouping | Patient Account can be grouped by Account Provider (default) or by Location or by Guarantor. |
|
| Default TYRO Terminal | User can set the default terminal for Tyro. | - This may vary for every Hospital/Practice |

