Healthlink Correspondence Configuration
1. Create Healthlink Import Directories:
In order for our clients to setup Healthlink within CareRight, several steps need to be taken to ensure a proper configuration. The first step is to define a Healthlink Import Directory, which is done via Administration → Secure Messaging → Healthlink Import Directories.
- Location: Used to attach a location to incoming Healthlink messages; and,
- EDI: A messaging address provided to the practice by Healthlink.
- Vendor: Select vendor from dropdown lists.
- Check tick box to enable.

2. Configuring location:
Australia
No specific location setup required.
New Zealand
Add Health Provider Index Facility Code:
It is also necessary to provide a Health Provider Index Facility Code for the Location receiving Healthlink messages (issued by the Ministry of Health).
This is a 4 digit alphanumeric code issued by the New Zealand Ministry of Health.
Administration - > Location - > Edit -> Add Health Provider Index Facility Code - > Update

3. Configuring Healthlink Messaging for Professional Contacts
To send an electronic message via Healthlink to a professional contact, they must have an EDI configured on their record in CareRight. To automatically match an incoming correspondence from Healthlink.
- From the Dashboard, click Professional Contacts.
- Click on a Contact name.
- Click Edit for a contact.
- In the Contact Details panel, ensure that the First Name, Last Name and NZMC (New Zealand only) fields are completed to ensure proper receipt of messages.
- To ensure that messages are sent correctly, ensure that the EDI field is completed.

In addition to the above, we highly recommend configuring an NZMC for each Provider that will be used as sender of messages via HealthLink. This makes it easier for the receiving system to match it to the intended recipient.
4. Configuring Healthlink Messaging for Provider:
- From the Dashboard, click Providers.
- Click on a Provider name.
- Click Edit for a Provider.
- In the Secure Messaging panel, ensure that the NZMC field is completed for New Zealand)
- In the Secure Messaging panel, ensure EDI field is complete for all.


6. Specifying a Patient's NHI Number (New Zealand Patients):
In New Zealand, patients are identified via a National Health Identifier (NHI). This can be specified in CareRight as follows:
- Search for a patient.
- Click Show.
- Click Edit.
- In the CRN (or NHI) field, enter or modify the identification number as needed.

Sending Letters via Healthlink
Sending a letter via Healthlink is functionality identical to standard patient letters, with the following minor variations.
In the Delivery Option header, click on the drop-down menu and select Healthlink.
In addition, if your letter refers to either an abnormal finding or correction to a prior communication, this can be indicated:

After sending:
- Message will appear in the Outbox with the status "Confirmed" and the delivery method as "Healthlink";
- After 2-4 minutes have passed, the status will change to "Sending" — this indicates that the Clintel Uploader has received the letter and passed it on to the Healthlink system.
- When the receiving system has acknowledged receipt of the letter, the status is changed to “Sent."

Important hints:
- The Location of the letter must match the location of the Healthlink directory;
- If an EDI is configured, then the Healthlink option will be selected by default;
- If the Provider has an NZMC, it will be included in the message to allow the receiving system to link the letter to the intended recipient.
Viewing Additional Letter Details
- In the Correspondence panel, click Show for a letter.
- Additional information appears:
- A “message control ID” is present. This is a unique identifier (within the location’s EDI) used in the Healthlink messaging system. If HealthLink is contacted to troubleshoot any issues, they will need this ID.
- Below the letter text, the generated PDF that was included in the message is shown. This will show the letter as the receiver will see it, including any letter template.

Error Status Codes When Sending
If something goes wrong with sending a letter, the status will display:
- Confirmed: This means the Uploader has not received the letter. Possibilities:
- The uploader is not configured properly;
- The uploader cannot connect to CareRight over the network; and/or,
- The letter’s location doesn’t match the Healthlink directory location.
- Sending: This means the Uploader has given the message to HealthLink but we have not received an acknowledgement. Possibilities:
- HealthLink client is incorrectly configured;
- HealthLink client cannot access the Healthlink network;
- Receiving system is down or can’t access the Healthlink network;
- Receiving system has an error processing CareRight’s message; and/or,
- Uploader cannot connect to CareRight over the network.
A warning message will be shown when a user views a message which has not been acknowledged after one hour.
Receiving Letters via Healthlink
If a letter is received via Healthlink it will appear on the patient’s correspondence page in the Inbox tab. If the message contained a PDF, the PDF will be displayed when Show is clicked. Otherwise the text of the message will be shown. The Healthlink Message Control ID is also displayed.

Unmatched Correspondence
If a correspondence is received via Healthlink and it cannot be automatically linked to a patient and a provider, it will be shown as “Unmatched Correspondence” on the Unmatched tab.
Via Global view:
- From the Dashboard,
- Click Correspondence.
- Click Unmatched.
Via Location view:
- From the Dashboard, click Location.
- Click Correspondence.
- Click Unmatched.

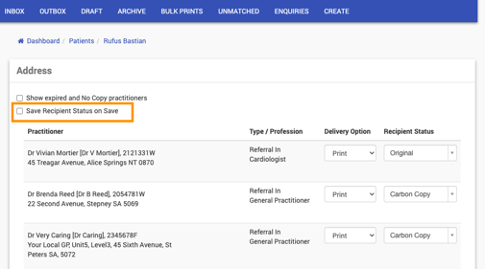
Save Recipient Status On Save (v6.68 Enhancement)
It can be difficult to change recipient status when in the middle of a letter
If required users can tick a Save Recipient Status on Save while creating / editing a letter.
All the professional contacts shown to the user will have their recipient Statuses saved back to the referral record for next letter generated.
To do this -
- From the Dashboard Click Patients
- Choose patient and click Show
- Click Correspondence
- Select an option for the new contact or patient letter and click New
- Select the recipients
- Click Save Recipient Status on Save