The Reconciliation screen will list all/any Transactions for all Locations for your organisation. This is a useful screen to locate Transactions paid to you and to reconcile against your organisations bank account. You can also utilise this screen to confirm your electronic payments from Medicare, DVA and Health funds.
Access Reconciliation Screen
From the CR Dashboard:
- Select Reconciliations from Menu.
- The Transactions screen will display the following fields:
Field | Description | Example |
|---|---|---|
Location | This is the Location the transaction was made | Clintel Clinic |
Date | This is the date the transaction was processed | |
Banked | This is the status of the Transaction (banked /unbanked) | Unbanked |
Amount | This the amount of the Transaction | |
Transaction | This is they Transaction Type - Cash, Direct Deposit | Direct Deposit |
Receipt | This is hyperlink to the specific receipt | |
Batch | This the Batch process id - if Medicare processed | |
Invoice | This is the Invoice number, if relevant | |
Payment Report | This the associated Payment Report, if relevant | |
Payment Amount | This is the payment amount, if relevant | |
Guarantor | This is the associated Guarantor, if relevant | |
Provider | This is the associated Provider, if relevant | |
Information | Any additional Information |
From this screen you can completed the following tasks:
- Change Search Criteria.
- Bank any unbanked transactions i.e. electronic deposits (confirm receipt of payment into bank account).
- Take Payment from Guarantor - refer to Payment from Guarantor.
How to Change Search Criteria
This will change the display of transactions on the screen.
- Select Change Search Criteria button.
- The search screen will display.
- Change the search values by:
- Medical Provider
- Location
- Guarantor
- Transaction Type
- Banked -
- Identifier
- Change the time period - Receipted Between:
- Start Dates
- End Dates
- Select a specific amount - Amount Between:
- High
- Low
- Select the Create Search Reconciliation button.
Reconciling Medicare Batch Payments
- Access Reconciliations.
- In the sub-menu, click Batch Payments.

Interface: Medicare Batch Payments
The Medicare Batch Payment Reports screen is organised into three tabular interfaces:
- Manual: Medicare batch payments where all processing reports have been received, but not all receipts were created or allocated. This interface also displays batch payments where all processing reports have not been received and the payment is over 10 days old;
- In Progress: Medicare batch payments where all processing reports have NOT been received and the payment is 10 days old or less; and,
- Archived: Medicare batch payments that have been marked as processed.

Interface: Batch Payment View
- View payment reports.
- Click Show.
- The Medicare Batch Payment Reports screen appears.

| Column Header | Description |
| Claim ID | Claim identification number. |
| Batch Account | Batch account number — click to view details. |
| Processing Report | View details of the batch processing. |
| Benefit | The amount of the benefit. |
| Date of Lodgement | The date when the batch was lodged. |
| Payment Status |
|
| Receipted | The amount that was receipted. |
Allocating
If a batch shows a Payment Status of 'Invoice(s) Reversed' or 'Manual Allocation Required' then the user will need to manually perform the allocation in order to finalise the batch
- Click Allocate
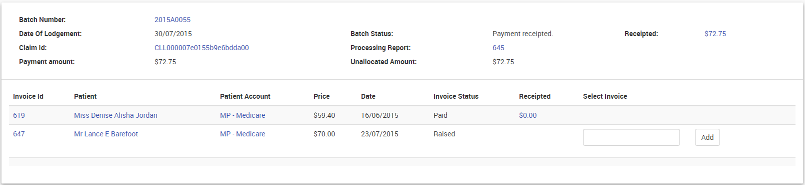
- The details of the invoices originally included in the batch are displayed
- Where an invoice has been reversed or removed from the batch, a field appears under the Select Invoice column for entering the replacement invoice number
- Enter the replacement invoice number and press the Add button
- The details of the replacement invoice is displayed along with the items on that invoice
- Allocate the required amounts to the item(s)
- Once all the allocations have been entered, click the Allocate button

Display of Medicare Rebates
CareRight records the Medicare Benefit payable for a PCI claim on the invoice based on the scheduled rate configured in CareRight. This is recorded as the Rebate Price. However the actual benefit paid by medicare may be different due to the following:
- The patient is not eligible for service (i.e. no benefit paid).
- The rate configured in CareRight have not been update so medicare benefit is different to what is configured.
- The patient is eligible for medicare safety net and receives a higher rate of benefit.
Given this situation, a new field termed "Rebate Paid" will be added as a line item to invoices when applicable. Rules for the display of rebate information are:
- Rebate Paid: Appears if a rebate has been paid by Medicare.
- Rebate Price: If the Rebate Paid field is applicable AND if the Rebate Price is the same value as the Rebate Paid, then the Rebate Price field will not display.

Backdating a Transaction
If a user has the appropriate permissions to edit account transactions, then they can modify individual transaction dates. After clicking Allocate, an option (checkbox) to backdate transaction history will appear. When selected, a mini-calendar appears enabling the user to select a different transaction date.
Backlink to Original ERA (New v6.65 Feature)
When viewing a receipt that was automatically created by the system from an Eclipse Remittance Advice (ERA), CareRight provides a display of the originating ERA and link back to the display screen for that ERA.

