Generate Online Batches
Online Batch Claims enables the user to send batches directly from CareRight to Eclipse.
Invoices eligible for online batching will appear under Online Invoices in the Unbatched Invoices tab.
Batches can be created simply via the Creat Batch Claim button. Please refer to Unbatched Invoices for more information
1. Access the Online Batch Claims
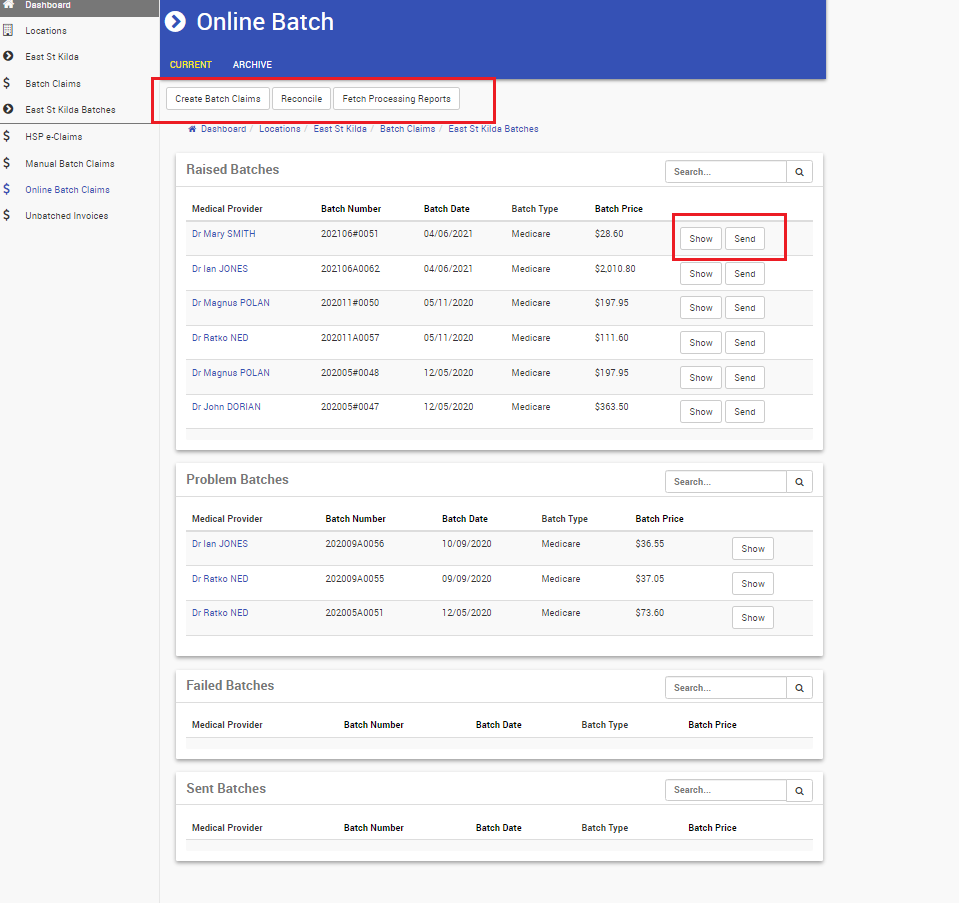
Online Batch Claims generated can be accessed in the Online Batch Claims tab.
- From the Dashboard.
- Select Locations.
- Select relevant Location by Clicking Show.
- Select Batch Claims from the left-hand menu.
- Click on Online Batch Claims.
- You will see Online Batches and their status (Raised, Sent, Processed, Problem). Paid batches will move to ‘Archive’.Raised Batches
Batches Raised, Ready to send Problem BatchesBatches under Problem state based on Processing Report analysis. When Medicare has assessed a batch they will provide a processing report detailing how a claim will be paid. If no payment will be made, the batch is put in the Problem state. Also, If only a partial payment has been made then the batch is marked as Problem. Failed BatchesBatches will automatically be classified as failed when:
- When a batch is in Raised status;
- Has a valid claim submission; and,
- No processing report after 10 days.
An error message will appear as follows:
 Sent BatchesBatches Sent. If a payment is due from Medicare, the batch is left in the Sent state until payment has been made.
 - Click Create Batch Claim – this will add any raised DVA / Bulk Bill invoices to new batches.
- Click Reconcile to reconcile based on Medical Provider
- Click Fetch Processing Report to fetch Medicare Processing reports manually.
 Interface
- You will see Online Batches and their status (Raised, Sent, Processed, Problem). Paid batches will move to ‘Archive’.
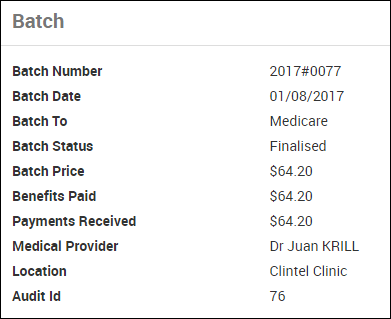
- When viewing a batch, an information panel appears that conveys the following information:
- Batch Number
- Batch Date
- Batch To
- Batch Status
- Batch Price
- Benefits Paid
- Payments Received
- Medical Provider
- Location
- Audit Id
- All raised invoices will now be created in Batches by provider and Type (DVA or Medicare).
- Send each Batch when ready.
- Enter your CareRight password and click Send.
- You will receive a message of whether the batch has been sent successfully or unsuccessfully with the error message of what to fix.


 Interface
Once payment has been made, then a batch is automatically paid down. If the batch is paid in full, then the batch is marked as Paid. This will then move into the Archive Tab.
Notes:
|
2. Create Batch Claims
In preparation to sending the Batch to Medicare via CareRight (Eclipse), you must create the batch:
- From the Dashboard.
- Select Locations.
- Select relevant Location by Clicking Show.
- Select Batch Claims from the left-hand menu.
- Click on Batch Claims > Unbatched Invoices
Unbatched Invoices:
Option 1:
You can select ALL so all Invoices for ALL Medical Providers in that Location is sent in ONE Batch.

Option 2:
Select the only applicable Medical Provider/s you wish to raise a batch for sending to Medicare via CareRight (Eclipse).

3. Send the Batch to Medicare via CareRight (Eclipse)
Now, that the Batch has been raise, it will be ready to be sent.
- From the Dashboard.
- Select Locations.
- Select relevant Location by Clicking Show.
- Select Batch Claims from the left-hand menu.
- Click on Batch Claims > Online Batch Claims
Send Online Batch Claims:
Option 1:
You can send batch per Medical Provider (repeated steps for each Medical Provider)
1. Select Send against the Medical Provider.

Option 2:
Bulk Send raised Batches - All ticked batches will be sent.

